
Canes | SeniorTechLife
Learn how to fit, hold, and use a walking stick for light support, including safe steps, uneven ground, home use, and signs that more support is needed.
How to use a walking stick safely starts with fit: keep the tip close to your body and use it only for the amount of support it can realistically provide. A walking stick can add a helpful contact point for light balance support on familiar routes. It is not automatically a replacement for a medically fitted cane, a walker, or individualized therapy.
This guide uses “walking stick” to mean a hand-held support aid used for walking. If you mean a clinical cane after surgery or with significant weakness, follow the specific instructions from your clinician. The safest device is the one that fits your abilities, your environment, and the amount of support you need.
Quick answer: how to use a walking stick safely
Stand upright with the stick near the side that feels strongest unless a clinician has taught you another pattern. Place the stick a short step ahead, move the weaker or more painful leg with it, and then step through with the stronger leg. Keep your shoulders relaxed and avoid reaching far ahead with the stick.
Use short, controlled steps rather than trying to gain support by leaning hard through the handle. If you must pull on the stick to keep from falling, the device may not provide enough support for the task.

Fit a walking stick before you rely on it
Wear the shoes you normally use for walking and stand on a level surface. The handle should sit near the wrist crease when your arms are relaxed. When you hold it, your elbow should be comfortably bent rather than locked straight or lifted toward your shoulder.
| Check | What good fit looks like | Why it matters |
|---|---|---|
| Height | Handle near wrist level with a slight elbow bend. | Helps the shoulder stay relaxed and the stick stay close enough to control. |
| Tip | Rubber tip sits flat, is not cracked, and has usable tread. | A worn or loose tip can slide even when the shaft looks intact. |
| Handle | Grip is comfortable without wrist pain, numbness, or a forced angle. | Pain or poor grip can make the hand release at the wrong moment. |
| Adjustment | Any height button or collar is fully engaged. | A loose adjustment can change the height or stability unexpectedly. |
MedlinePlus notes that mobility aids such as canes and walkers often need fitting. A professional can help when posture, shoulder pain, leg-length differences, or balance concerns make a simple adjustment unreliable.
Know when a walking stick is appropriate
A walking stick may be appropriate when you need light balance support, can bear weight through both legs, and can maintain a steady path without reaching for furniture or leaning heavily on the handle. It can be useful on a short, predictable route when it is fitted and used consistently.
A cane walking stick may look similar to a recreational stick, but the intended use, grip, tip, and fit can be different. If you rely on the aid every day or after an injury, treat it as safety equipment rather than a casual accessory.
Consider more support when both legs are weak, your balance changes in several directions, the stick is not enough to stop a near-fall, or fatigue changes the way you walk. A walker may offer a wider base, but it also requires room, hand control, and training.
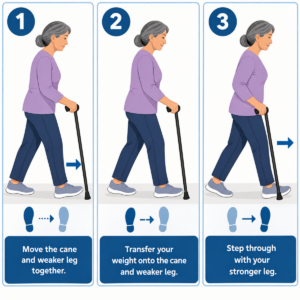
Use a simple, controlled walking-stick sequence
Practice first on a dry, uncluttered surface with a sturdy chair or trained helper nearby. Keep the stick close enough that you do not have to reach or twist across your body.
- Stand balanced first. Place both feet securely before beginning.
- Move the stick a short distance. Let the tip land flat before weight is applied.
- Move the weaker or painful leg with the stick. Keep the step short and controlled.
- Step through with the stronger leg. Do not rush past the support point.
- Reset after a turn or surface change. Small steps are safer than twisting around a planted stick.
People sometimes use “walking stick and cane” as if the terms mean exactly the same thing. The key safety issue is not the label; it is whether the aid gives enough support and is used with a repeatable pattern.
Turn, sit, and stand without relying on the stick alone
Slow down before turning. Keep the stick close and take several small steps rather than planting it far away and pivoting sharply. A sudden twist can increase pain or cause the tip to lose secure contact.
When sitting, back up until both legs touch a stable chair, keep the stick controlled in one hand, and reach for the armrest with the other hand. When standing, push from the chair as instructed by your clinician; do not pull yourself upright on a freestanding stick.
The chair and your legs should do the main work during a transfer, not the walking stick. If a transfer feels unsafe, ask a therapist to demonstrate a technique for your situation.
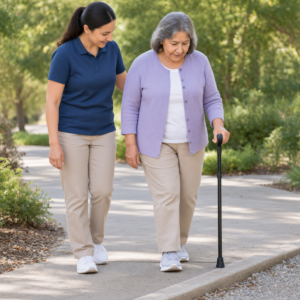
Use a walking stick outdoors with extra care
Grass, gravel, wet leaves, sloped pavement, and uneven paths can make a narrow tip sink, slide, or land at an angle. Choose a firm route when possible, shorten your steps, and pause before curbs, drains, or changes in surface.
Do not test a new stick for the first time on stairs, steep slopes, ice, or crowded areas. If outdoor walking requires constant attention to keep the tip from slipping or you cannot use a handrail when needed, a different route or mobility aid may be safer.
Good lighting matters outdoors and inside. CDC fall-prevention guidance also emphasizes clear walking routes and footwear with a secure, nonslip sole.
Approach curbs and stairs with a walking stick carefully
Curbs and stairs add a change in height, a narrower support area, and less time to recover from a misstep. Do not make them the first place you practice a new walking stick. A physical therapist can show a sequence that matches your stronger and weaker sides, footwear, handrail access, and the condition that led you to use the stick.
When a secure handrail is available, keep one hand on it and use the stick in the other hand only if you can control both safely. Take one step at a time and pause at the top or bottom before moving on. If there is no rail, the surface is wet, or you cannot maintain your balance without rushing, use another route or ask for help.
Do not turn a walking stick into a substitute for a handrail, a ramp, or trained assistance. Choosing the safer route is a mobility skill, not a failure of independence.
Keep the walking stick ready for everyday use
Inspect the tip before regular use and after a walk on rough ground. Dirt, small stones, worn rubber, and moisture can change the grip at the point where the stick meets the floor. Replace a tip that is loose, cracked, hardened, worn smooth, or allows the shaft to show through.
Check the handle and adjustment points as well. A loose handle, bent shaft, or partially engaged height button can make the stick less predictable. Keep the stick where you can reach it before standing, rather than leaning it across a doorway or leaving it in a place that requires unsupported steps to retrieve it.
Prepare the home for safer walking-stick use
Keep the stick within reach before standing from bed, a chair, or the toilet. Remove clutter, secure cords, repair loose flooring, and address rugs that curl or slide. A stick cannot compensate for a dark hallway or a slippery bathroom floor.
Keep one hand free while walking. A small backpack or securely worn bag is safer than carrying a drink, phone, or loose items in the same hand that controls the stick.
Know when a walking stick is not enough
Request professional help after a fall, surgery, new pain, repeated near-falls, rapid fatigue, or a major change in balance. Reassess the device if you start leaning heavily, dragging the tip, avoiding rooms because the route feels unsafe, or using furniture as a second support.
Also inspect the stick. A worn tip, loose handle, cracked shaft, or failed adjustment lock can create an equipment problem that feels like a change in your balance.
Reassessment is also useful after a hospitalization, medication change, new vision problem, or change in footwear. The aid may still be the same, but the person and environment may have changed enough that the original technique is no longer the safest one.
Common questions about using a walking stick
These answers give general safety guidance. Individual instructions from a clinician take priority after surgery, illness, or a change in walking ability.
Which hand should hold a walking stick?
For one weaker or painful leg, the usual pattern places the aid in the opposite hand. A clinician may recommend a different approach for specific conditions or upper-body limitations.
Can a walking stick replace a cane?
Not always. A recreational or decorative stick may not have the grip, tip, adjustment, or load characteristics needed for daily balance support. Have it assessed if you depend on it.
How do you use a walking stick on stairs?
Do not try stairs alone until a therapist has taught the sequence for you. Use a secure handrail when available, take one step at a time, and choose another route if you cannot maintain control.
What if both legs are weak?
A single stick may not provide enough support. A clinician can help determine whether a cane, walker, crutches, wheelchair, or another option better matches the need.
Final checklist for walking-stick use
- The height, handle, adjustment, and tip have been checked.
- The stick stays close to the body and is not used for heavy leaning.
- Walking, turns, and chair transfers are controlled and repeatable.
- Home routes are clear, dry, and well lit.
- Outdoor surfaces and stairs are approached with extra caution.
- A professional review is planned if balance, pain, weakness, or falls are concerns.