
Wheelchairs | SeniorTechLife
Plan a wheelchair ramp around rise, slope, landings, width, surface, wheelchair fit, local codes, and safe daily use.
A Wheelchair and Ramp must be matched as one system. The ramp has to fit the vertical rise, available space, doorway, landings, surface conditions, and local rules, while the wheelchair has to fit the clear width and be controllable on the slope. A ramp that is technically long enough can still be unsafe if there is no level place to open the door, turn, stop, or recover from rain and debris.
This guide explains how to plan a Wheelchair and Ramp without pretending that one formula replaces a site inspection. It covers the questions a homeowner, caregiver, wheelchair user, contractor, or accessibility professional should answer before selecting, building, or using a ramp. It is not a structural drawing, permit approval, or individualized mobility assessment.
Safety note: Do not build or install a ramp from an online article alone. Structural loads, frost, drainage, anchoring, guards, handrails, electrical clearances, fire exits, property lines, and local permits require site-specific review. A licensed contractor, design professional, building official, and rehabilitation professional may all have a role.
Quick answer: what makes a Wheelchair and Ramp usable?
A usable Wheelchair and Ramp has a gentle slope, level landings, enough clear width, a firm and slip-resistant surface, safe edges, reliable handrails or guards where required, and a route that works with the actual wheelchair. The user should be able to approach, enter, travel, stop, turn, and open the door without balancing on the slope.
For facilities covered by the 2010 ADA Standards, a ramp run generally cannot be steeper than 1:12. That means at least 12 inches of horizontal run for each inch of vertical rise. The standards also address cross slope, clear width, rise per run, landings, handrails, edge protection, and drainage. A private residence may be governed by different state or local rules, so the ADA figure is a useful accessibility baseline, not automatic proof that a home design is legal or suitable.
Start with four facts: the wheelchair, rise, doorway, and route
Do not begin with ramp material or a product listing. First record four facts that determine whether a Wheelchair and Ramp can work safely: the exact wheelchair, the vertical rise, the doorway and landing, and the full route before and after the ramp.
Four checks to complete before selecting a Wheelchair and Ramp
| Check | What to record | Why it changes the plan |
|---|---|---|
| Wheelchair | Type, widest fixed point, total loaded weight, ground clearance, and limits in the user manual. | These details determine usable width, structural load, transitions, and whether the user can control the slope. |
| Vertical rise | The exact height from the lower finished surface to the finished threshold. | Rise sets the minimum run length and shows whether the site has room for landings and turns. |
| Doorway and landing | Door swing, threshold height, clear opening, and level space needed to stop and operate the door. | A ramp that reaches the door is not useful if the user must balance on a slope to open it. |
| Full route | Surface, drainage, weather exposure, lighting, utilities, property limits, and emergency access. | The route must remain usable beyond both ends of the ramp, including in rain, snow, or an emergency. |
If any one of these four checks is uncertain, pause the project and obtain site-specific guidance. This approach gives the reader a clear starting point without asking them to solve a dozen design problems at once.
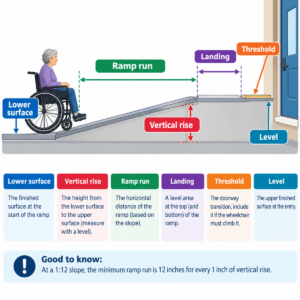
Measure the rise before choosing Wheelchair and Ramp length
The vertical rise is the height from the lower finished surface to the upper finished surface. Measure it with a level rather than following the slope of the ground. Include the threshold if the wheelchair must climb it.
At a 1:12 slope, the minimum run is simple to estimate: multiply the rise in inches by 12 to get the run in inches. Divide by 12 for feet. The examples below show ramp run only; they do not include level landings, turns, door maneuvering space, or transitions.
Illustrative 1:12 Wheelchair and Ramp run calculations
| Vertical rise | Minimum run at 1:12 | Planning reminder |
|---|---|---|
| 2 inches | 24 inches (2 feet) | A threshold solution still needs stable support and a smooth transition. |
| 4 inches | 48 inches (4 feet) | Check the portable ramp manufacturer’s permitted rise and chair limits. |
| 6 inches | 72 inches (6 feet) | Handrail and local-code questions may begin at this rise. |
| 12 inches | 144 inches (12 feet) | Allow additional space for landings and door operation. |
| 24 inches | 288 inches (24 feet) | A switchback or modular layout may be needed when the property is short. |
A longer, gentler ramp may be easier to use than the steepest slope a rule permits. The ADA advisory encourages the least possible running slope where practical because long ramps can also create an endurance burden. The design must balance grade, distance, landings, turning, and the user’s abilities.
Use ADA Wheelchair and Ramp rules as a baseline, not a home-design shortcut
The 2010 ADA Standards apply to covered state and local government facilities, public accommodations, and commercial facilities. They do not automatically govern every private single-family home. Even so, their technical provisions offer a clear vocabulary for discussing accessible ramps with a contractor or building official.
Selected 2010 ADA Wheelchair and Ramp provisions for covered facilities
| Feature | Selected requirement | Why it matters in planning |
|---|---|---|
| Running slope | Not steeper than 1:12, subject to limited exceptions for existing sites | Controls the minimum run needed for the rise. |
| Cross slope | Not steeper than 1:48 | Reduces sideways drift and unequal loading. |
| Clear width | 36 inches minimum | The usable width is measured between obstructions or handrails. |
| Rise per run | 30 inches maximum | Higher entrances require multiple runs and landings. |
| Landings | At top and bottom; generally 60 inches minimum in the direction of travel | Provides level space to stop, turn, and operate doors. |
| Handrails | Generally required when a ramp run rises more than 6 inches | Requirements include height, continuity, clearance, gripping surface, and extensions. |
| Edge protection | Required in many ramp and landing conditions | Helps prevent casters and tips from leaving the surface. |
| Wet conditions | Landings must be designed to prevent water accumulation | Drainage is a safety feature, not a finishing detail. |
Read the current standard and local code rather than copying numbers from a product listing. A local rule may require a permit, guards, footings, snow-load capacity, setbacks, or details not summarized here.
Plan landings before you plan the Wheelchair and Ramp runs
A level landing is where the user can stop without rolling downhill. At a door, it also provides room to reach hardware and move through the opening. If the door swings into the clear area, a landing that looks large on a sketch may not provide enough maneuvering space.
Landings are also needed where a ramp changes direction. A turn made on a sloped surface creates a compound movement that is difficult for wheelchair casters and users with limited trunk control. The turning area should be level, unobstructed, and large enough for the actual device.
At the bottom, the landing should connect to a stable accessible route. Ending a ramp in grass, loose gravel, deep mulch, a gutter, or a steep driveway can erase the benefit of the ramp itself.
Check clear width, hand clearance, and wheelchair geometry
Nominal ramp width is not the same as clear width. Posts, curbs, handrails, hinges, door trim, or a narrowed transition can reduce the usable space. Measure the wheelchair at its widest fixed point and allow room for hands, elbows, wheel rims, oxygen holders, and bags.
A manual wheelchair user may need extra hand clearance at the push rims. A power wheelchair may be wider, longer, heavier, and less forgiving when a caster or drive wheel approaches an edge. A scooter may have a long wheelbase and low ground clearance that catches at slope transitions.
Test the exact device, not a generic wheelchair width. Two wheelchairs with the same seat width can have different overall dimensions and turning paths.
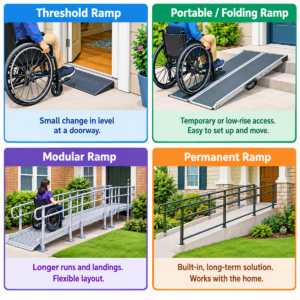
Choose the right Wheelchair and Ramp type
The best format depends on rise, duration, available space, weather, total load, and who will set up the ramp. A portable ramp is not automatically safer because it can be moved, and a permanent ramp is not automatically accessible because it looks substantial.
Threshold Wheelchair and Ramp
A threshold ramp addresses a small change in level at a doorway. It must be stable, wide enough, and compatible with the threshold shape. A beveled transition on one side does not solve an abrupt drop on the other.
Portable or folding Wheelchair and Ramp
A portable Wheelchair and Ramp may work for temporary access, travel, or a low rise. Verify the manufacturer’s maximum rise, minimum length, total capacity, usable width, support requirements, and permitted wheelchair types. The ramp should be placed on firm surfaces and secured exactly as instructed. A caregiver should not carry a ramp that is too heavy or awkward to control.
Modular Wheelchair and Ramp
A modular Wheelchair and Ramp system can create longer runs and landings without a custom wood structure. It may adapt to a rental home or changing need, but it still requires a stable foundation, correct layout, anchoring, drainage, edge protection, and inspection. Compare exact systems only after their specifications and the site requirements have been verified.
Permanent site-built Wheelchair and Ramp
A permanent Wheelchair and Ramp may be integrated into a porch or entry. Wood, concrete, steel, and composite materials have different structural, weather, maintenance, and slip-resistance characteristics. The design must address local code and the site’s actual soil, climate, drainage, and connections.
Surface, drainage, and weather are part of Wheelchair and Ramp safety
The surface should remain firm, stable, and slip resistant under expected conditions. Deep grooves can catch small casters, while smooth finishes may become slick when wet. Loose mats, worn anti-slip strips, algae, ice, leaves, and standing water need regular attention.
Place gutters and downspouts so water does not cross the ramp or landing. In snowy climates, plan how the ramp will be cleared without damaging the surface. Salt and chemicals can affect metal, concrete, wood, wheelchair bearings, tires, and service animals, so maintenance products should be selected carefully.
Outdoor lighting should reveal edges, landings, door hardware, and surface changes without creating glare. A backup plan is needed if the ramp becomes unusable during severe weather.
Do not overlook edges, guards, and handrails
Edge protection helps keep small front casters, cane tips, and crutch tips from leaving the ramp. Guards address larger fall hazards. Handrails give some users a grasping surface, but they must not narrow the route below the required clear width or create snag points.
Handrails should be continuous where required, securely mounted, comfortable to grip, and free of sharp or abrasive surfaces. The correct height and extension depend on the governing standard. A decorative rail is not necessarily a compliant handrail or guard.
A wheelchair user who propels by the push rims also needs hand clearance. Rail posts or brackets that intrude into that path can injure fingers or force the chair toward the opposite edge.
Plan a ramp project with qualified review
The first step is not cutting material. It is documenting the site, user, device, code, and maintenance plan. A safe project usually follows this sequence:
- Confirm the route. Choose the entrance that provides the safest connection inside and outside.
- Measure the vertical rise. Use finished surfaces and include the threshold transition.
- Calculate a preliminary run. Use the applicable slope requirement and add landings, turns, and door maneuvering space.
- Check the wheelchair. Record width, length, weight, ground clearance, control method, and manual limits.
- Contact the building authority. Ask about permits, zoning, setbacks, guards, handrails, foundations, and inspections.
- Choose a qualified designer or contractor. Provide the measurements and require a drawing that shows slope, landings, clear width, structure, drainage, and connections.
- Review the plan with the user. A code-compliant ramp can still be difficult for a particular person to use.
- Inspect before use. Verify fasteners, transitions, rails, edges, surface, drainage, and the path beyond both landings.
- Test under supervision. Begin slowly and stop if the wheelchair scrapes, drifts, stalls, tips, or cannot be controlled.
This checklist organizes the project, but a structural professional must determine materials, member sizes, footings, connections, and loads. It is a planning guide, not a construction drawing or permit substitute.
Make temporary Wheelchair and Ramp access safer
Temporary access should use an engineered Wheelchair and Ramp that is rated for the exact load and installed according to its manual. Plywood placed over steps, unsecured boards, improvised hinges, or ramps resting on unstable furniture can shift or fail.
Before each use, confirm that the upper lip or attachment is secure, the lower edge sits flat, the surface is clean and dry, and the path is free of pedestrians. Do not exceed the manufacturer’s permitted rise or span. If the ramp flexes, rocks, separates, or moves during a dry run, stop using it.
A portable ramp may also create a trip hazard for other people. Remove and store it only when the user has another safe route and the caregiver can handle the ramp without injury.

Test the complete Wheelchair and Ramp route before daily use
The test starts on level ground. Confirm the wheelchair is in good condition, the tires are appropriate, batteries are charged when applicable, and loose bags or oxygen tubing cannot catch. Use the assistance method taught for that user and device.
- Approach the ramp in a straight line.
- Pause on the lower landing and confirm the route is clear.
- Travel at a slow, controlled speed without turning across the slope.
- Stop only on a level landing unless the device manual and training say otherwise.
- Check the transition at the top for footrest, caster, anti-tip, or battery-box contact.
- Open and pass through the door without rolling backward or blocking the threshold.
- Repeat the route in the opposite direction under the same supervision.
Do not assume that a caregiver can safely push a manual wheelchair up a long ramp or control it downhill. Body size, chair weight, slope, surface, handrail layout, and the caregiver’s strength all matter. Obtain hands-on training if assistance is needed.
For a power wheelchair or scooter, follow the device manual for slope direction, speed, anti-tip settings, freewheel mode, and braking. Never disengage the drive or brakes to coast down a ramp.
Wheelchair and Ramp inspection and maintenance checklist
- Remove leaves, dirt, snow, ice, and standing water.
- Check that the surface is secure and not polished, loose, warped, or delaminating.
- Inspect transitions for gaps, lifted edges, and caster traps.
- Confirm rails, guards, curbs, and fasteners do not move.
- Look for rust, rot, concrete cracking, settlement, and erosion near supports.
- Verify that doors, gates, and latches still operate from the landing.
- Keep lighting functional and the full clear width unobstructed.
- Recheck the route after storms, construction, landscaping, or wheelchair changes.
A ramp is not a one-time purchase; it is part of the home’s safety system. Maintenance should be assigned to a specific person and documented when several family members or service providers share responsibility.
Plan for the full Wheelchair and Ramp cost
The total cost may include design, permits, site preparation, foundations, materials, delivery, labor, landings, rails, guards, lighting, drainage, restoration of landscaping, and future maintenance. A less expensive ramp that requires repeated setup or cannot remain outdoors may cost more in caregiver time and missed access.
Ask every provider to describe what is included, who obtains permits, what surface and weight rating are guaranteed, how the ramp is anchored, what warranty applies, and who handles inspection or repairs. Do not compare quotes that cover different scopes.
Compare proposals by scope, not only by price. Ask each provider to identify the measurements, code assumptions, structural work, drainage, handrails, landings, installation, inspection, and future maintenance included in the quote.
Wheelchair and Ramp questions
Use these answers as planning guidance, then confirm the final design with the relevant building authority and qualified professionals for the actual site and wheelchair.
How long should a Wheelchair and Ramp be?
Length depends on vertical rise, the applicable maximum slope, and the landings needed. At a 1:12 slope, each inch of Wheelchair and Ramp rise requires at least 12 inches of run, but the complete footprint is longer once landings and turns are added.
Is a 1:12 slope required for every home ramp?
No. The 2010 ADA Standards govern covered facilities, while private homes may follow state or local residential rules. Confirm the requirements with the building authority. A gentler slope may still be appropriate even when a steeper residential ramp is allowed.
Can I use a portable ramp over stairs?
Only if the exact ramp is designed for the measured rise and span, supports the full load, rests on stable surfaces, and is secured as the manufacturer directs. Many stair situations need a permanent or modular system.
How wide should a wheelchair ramp be?
Covered ADA ramp runs generally require at least 36 inches of clear width. A home ramp must follow applicable local rules and should also fit the actual wheelchair with hand and equipment clearance.
Does a wheelchair ramp need handrails?
It depends on rise, location, and the governing code. Under the ADA Standards, handrails are generally required on ramp runs with a rise greater than 6 inches, subject to listed exceptions. Local residential rules may differ.
Can a power wheelchair use the same ramp as a manual wheelchair?
Possibly, but verify device width, weight, ground clearance, turning radius, braking, and slope limits. A heavier power chair also changes structural load and recovery planning.
Who should inspect a new ramp?
The appropriate building official or inspector should complete required code inspections. The user and rehabilitation professional should also confirm that the route works with the person’s actual wheelchair and abilities.
What if there is not enough space for a safe ramp?
Do not make the ramp steeper simply to fit. Ask an accessibility professional about another entrance, a switchback layout, a platform lift, or other site-specific options.
Final Wheelchair and Ramp checklist
- The vertical rise was measured with finished surfaces.
- The calculated run uses the applicable slope requirement.
- Top, bottom, and turning landings are level and large enough.
- The clear width fits the actual wheelchair and hand position.
- The structure supports the complete expected load.
- The surface, drainage, rails, guards, and edges suit the site.
- The doorway can be operated from a level landing.
- Permits, inspections, and local requirements are confirmed.
- The user and any helper have practiced the route safely.
- A maintenance and bad-weather plan exists.
The best Wheelchair and Ramp is not merely one that reaches the door. It is a controlled, maintainable route that the actual wheelchair user can navigate with dignity and an appropriate level of assistance.
Official ramp standard referenced
U.S. Department of Justice: 2010 ADA Standards for Accessible Design
This guide is general planning information. It does not replace local code review, a permit, structural design, professional installation, or mobility tra