Canes | SeniorTechLife
Learn how to fit, hold, and walk with a cane, including turns, chairs, curbs, stairs, safety checks, and when to ask for professional help.
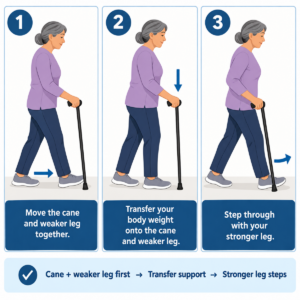
How do you use a walking cane? In the usual pattern for one weaker or painful leg, hold the cane in the hand opposite that leg, move the cane forward with the weaker leg, then step through with the stronger leg. The cane should be fitted to your height, its tip should be secure on the floor, and the sequence should be practiced slowly on a level surface.
That pattern is a general starting point, not a substitute for individual instruction. Your clinician may prescribe a different sequence after surgery, for a neurological condition, or when both legs are affected. If you have major weakness, severe balance problems, or need to put substantial body weight through the cane, a walker or crutches may provide more appropriate support.
Quick answer: the basic walking cane sequence
- Stand upright with the walking cane on your stronger side unless a clinician has told you otherwise.
- Place the cane a short, comfortable step ahead.
- Move the weaker or painful leg forward with the cane.
- Press through the handle only as much as needed for support.
- Step past the cane with the stronger leg.
- Look ahead, take controlled steps, and repeat the rhythm without rushing.
MedlinePlus describes the same general pattern: the cane and weaker leg move forward together, followed by the stronger leg. It also advises holding the cane opposite the weaker or surgical leg and adjusting the handle to wrist level with a slight elbow bend.
When is a cane for walking appropriate?
A cane for walking may suit someone who needs a small amount of help with balance, stability, pain, or one-sided weakness. The person should still be able to bear weight through both legs and control the cane without leaning heavily, dragging it, or placing it far away from the body.
A cane may not be enough when both legs are weak, balance is poor in several directions, the person frequently grabs furniture, or the walking pattern remains unsafe despite correct technique. MedlinePlus notes that a walker or crutches may be a better option when pain, weakness, or balance problems are substantial.
The cane should improve control, not become the only thing preventing a fall. If it bends, slips, or carries most of the person’s weight, stop and request a professional assessment.

Fit the walking cane before practicing
Wear the shoes normally used for walking. Stand upright on a level surface with both arms relaxed. The cane handle should be near the wrist crease, and the elbow should remain slightly bent when the handle is held. A therapist can refine the fit when posture, arm length, joint pain, or leg-length differences make a simple measurement unreliable.
Check the shaft and adjustment
An adjustable cane should lock firmly at the selected height. The button must protrude fully through the correct hole, and any collar or locking ring should be tightened according to the manual. Do not use a cane with a bent shaft, cracked handle, loose base, or repair that changes its strength.
Check the tip
The rubber tip should sit flat and grip a clean, dry floor. Replace it when the tread is worn, the rubber hardens, the metal shaft begins to show, or the tip no longer sits securely. Quad-cane feet should contact the floor in the orientation shown by the manufacturer.
Check the handle
The grip should allow the wrist to stay comfortable. Pain, numbness, or skin pressure can make the user release the cane at the wrong moment. A padded handle may feel comfortable, but the shape and size still need to fit the hand.
Which hand should hold the walking cane?
For one weaker, painful, or recovering leg, the cane is generally held in the opposite hand. If the left leg is weaker, hold the cane in the right hand. If the right leg is weaker, hold it in the left hand. This pattern lets the cane and weaker leg share the forward phase while the stronger side provides the next step.
There are exceptions. A person with severe hand, wrist, elbow, or shoulder limitations may not tolerate the usual side. A clinician may also prescribe a different pattern for specific neurological or orthopedic needs. Do not switch sides simply because one hand feels more familiar without checking whether the new pattern controls the affected leg.
How to walk with a walking cane
Practice beside a sturdy counter or with a trained helper nearby. Start on a dry, uncluttered floor. The goal is a smooth three-part rhythm, not a large reach.
- Set your posture. Stand tall enough to look ahead. Keep the cane close to your side rather than reaching across the body.
- Move the cane. Place it a short step ahead. The tip should land flat before weight is applied.
- Move the weaker leg. Bring the weaker or painful leg forward at about the same time as the cane.
- Transfer only the needed support. Use the cane to reduce load and steady the body without hanging on the shoulder.
- Step through with the stronger leg. Move the stronger leg beyond the cane to complete the cycle.
- Repeat slowly. Shorten the step if the cane lands too far ahead or the trunk leans sideways.
When learning how to use a walking cane, many people watch their feet continuously. Glance down only when the surface changes; otherwise, look ahead so you can see obstacles, doors, and other people.
If the cane repeatedly crosses in front of your feet, the sequence is too wide or the cane is on the wrong path. Stop, reset your stance, and take a smaller step.
How to turn with a walking cane
Slow down before the turn. Keep the cane close, take several small steps, and turn the whole body gradually. Do not plant the cane far away and twist sharply around it. Pivoting forcefully on the weaker leg can increase pain or loss of balance.
In a narrow space, make sure the cane tip does not catch a rug edge, furniture leg, or door frame. If the turn cannot be completed without crossing the feet, use a wider area or ask a therapist to teach a safer method.
How to sit down and stand up with a walking cane
Use a stable chair with armrests whenever possible. The chair, not the cane, should provide the main support while you sit or rise.
Sitting down
- Back up slowly until both legs touch the chair.
- Keep the cane controlled in one hand without placing it where it can slide.
- Reach back for the armrest with the free hand.
- Lower yourself using the chair, not by pulling hard on the cane.
Standing up
- Move to the front of the seat if that is safe for you.
- Place both feet securely.
- Push from the armrest or seat using the technique taught by your clinician.
- Find your balance before beginning to walk in a walking cane.
Do not pull upward on a freestanding cane to rise. It can tip or slide. A chair with stable armrests is usually easier to use than a soft, low chair.
How to use a walking cane on curbs and stairs
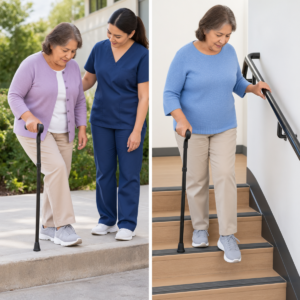
Practice curbs and stairs with a therapist or trained helper before trying them alone. The general sequence is stronger leg first when going up, then cane and weaker leg; when going down, place the cane first, then the weaker leg, then the stronger leg.
Going up one step or curb
- Move close enough that you do not have to reach with the cane.
- Step up with the stronger leg.
- Bring the cane and weaker leg up to the same level.
- Pause and regain balance before continuing.
Going down one step or curb
- Place the cane securely on the lower level.
- Bring the weaker leg down.
- Bring the stronger leg down last.
- Pause before moving away from the edge.
Using a flight of stairs
Use the handrail when available and hold the cane in the other hand. Take one step at a time. MedlinePlus describes going up with the stronger leg first, followed by the weaker leg and cane; going down begins with the cane, then the weaker leg, then the stronger leg.
Do not attempt stairs with a cane if you cannot keep one hand securely on the rail, control the sequence, or recover from a misstep. Ask for another route or assistance.
A walking cane for balance
Walking with a walking cane for balance works best when the cane adds a reliable contact point without replacing normal posture. Keep the tip close enough that the shoulder remains relaxed. Let the feet take controlled steps rather than dragging the weaker foot toward the cane.
Balance often worsens when attention is divided. Stop before using a phone, opening a bag, or carrying a drink. Keep one hand available for the cane and use a small securely worn bag for essential items.
Fatigue changes technique. If the cane begins landing farther away, the weaker foot stops clearing the floor, or the person starts looking down continuously, take a seated rest and reassess whether the route is too long.
Use a walking cane on different surfaces with care
A cane tip needs a firm, predictable place to land. Slow down or choose another route when the surface makes safe contact uncertain.
Carpet and rugs
Make sure the tip clears thick carpet and does not catch a rug edge. Secure or remove loose rugs and runners.
Wet or polished floors
Slow down and avoid the surface when possible. A clean cane tip can still slip on water, oil, wax, or loose powder.
Grass, gravel, and uneven ground
A narrow tip can sink or slide. Use a route with a firm surface, shorten the step, and obtain professional advice about a different tip or mobility aid rather than improvising.
Doors
Open the door from a stable position. Do not reach so far that the cane loses contact or the feet cross. Automatic doors or help from another person may be safer for heavy doors.
Common walking cane mistakes
- Holding the cane on the weaker side without a clinician-directed reason.
- Placing it too far ahead, which encourages leaning and delays support.
- Using the wrong height, causing a raised shoulder or bent posture.
- Walking before the tip is secure, especially on transitions.
- Twisting around a planted cane instead of taking small turning steps.
- Using worn tips or loose locks because the shaft still looks intact.
- Carrying objects in the cane hand or placing the cane under the arm.
- Continuing after a major change in balance instead of requesting reassessment.
Walking cane safety check
Inspect the cane before use and more carefully each week. Confirm that the tip is secure, the shaft is straight, the handle does not rotate, the height button is fully engaged, and the locking collar is tight. Clean the tip when dirt reduces grip.
Replace worn parts with components intended for the exact cane size and model. A tip that looks similar may fit loosely or change the angle of contact. Follow the manufacturer’s instructions and ask the supplier when compatibility is uncertain.
Store the cane where it can be reached before standing. Do not lean it against a wall where it can fall or place it across a walkway.
When to ask for professional help
Request an assessment if you have fallen, nearly fallen repeatedly, developed new pain, started leaning heavily, cannot coordinate the sequence, or feel unsafe on curbs and stairs. A therapist can evaluate strength, balance, sensation, vision, footwear, home layout, and whether another device is more appropriate.
Also seek help if the cane was borrowed, inherited, or purchased without fitting. The correct cane for one person may be the wrong height, grip, base, or capacity for another.
Walking cane questions
These brief answers reinforce the technique, but individual instructions from a clinician take priority after surgery, illness, or a change in balance.
Do you hold a cane on the strong or weak side?
For one weaker or painful leg, hold it on the opposite, stronger side unless a clinician has prescribed another pattern.
Should the cane move with the weak leg?
Yes, in the usual pattern the cane and weaker leg move forward together, followed by the stronger leg.
How high should a walking cane be?
The handle is commonly adjusted to wrist level while standing upright in everyday shoes, leaving the elbow slightly bent. Individual needs may require professional fitting.
Can I lean my full weight on a cane?
A cane is generally intended for limited support. If you must bear substantial weight through it or cannot remain steady, ask whether crutches, a walker, or another device is needed.
Can I use a cane on stairs without a handrail?
Stairs without a secure handrail can be unsafe. Do not attempt them alone if balance, strength, or cane control is uncertain. Use another route or trained assistance.
How often should I replace the cane tip?
Replace it when tread is worn, rubber is hard or cracked, the tip is loose, or the shaft begins to show. Inspect it daily if the cane is used often.
What if both legs are weak?
A single cane may not provide enough support. A clinician can determine whether a walker, crutches, wheelchair, or another aid better matches the need.
Final checklist for safe cane use
- The cane is the correct height and the elbow is slightly bent.
- The handle, shaft, lock, and tip are secure.
- The cane is held opposite the weaker or painful leg unless instructed otherwise.
- The cane and weaker leg move forward together.
- Turns use several small steps without twisting.
- Curbs and stairs have been practiced with appropriate help.
- Routes are dry, clear, and well lit.
- The cane is reassessed after falls, surgery, new weakness, or a major change in walking.
Safe cane use should feel controlled and repeatable. If the sequence requires constant concentration, causes pain, or still leaves you unsteady, pause and ask for a professional assessment.